How to Install a Crossarm on a Utility Pole
To install a crossarm, position it at the correct height and level on the pole, mount it with a through-bolt (or a pole band sized to the pole diameter at that height, since poles taper), add a brace to triangulate and stiffen it, drill/fit the insulator pins, and torque all bolts to specification. The crossarm must be level, square to the line, and rated for the conductor loads. Use the right bolts, washers, and a galvanized finish for outdoor life.
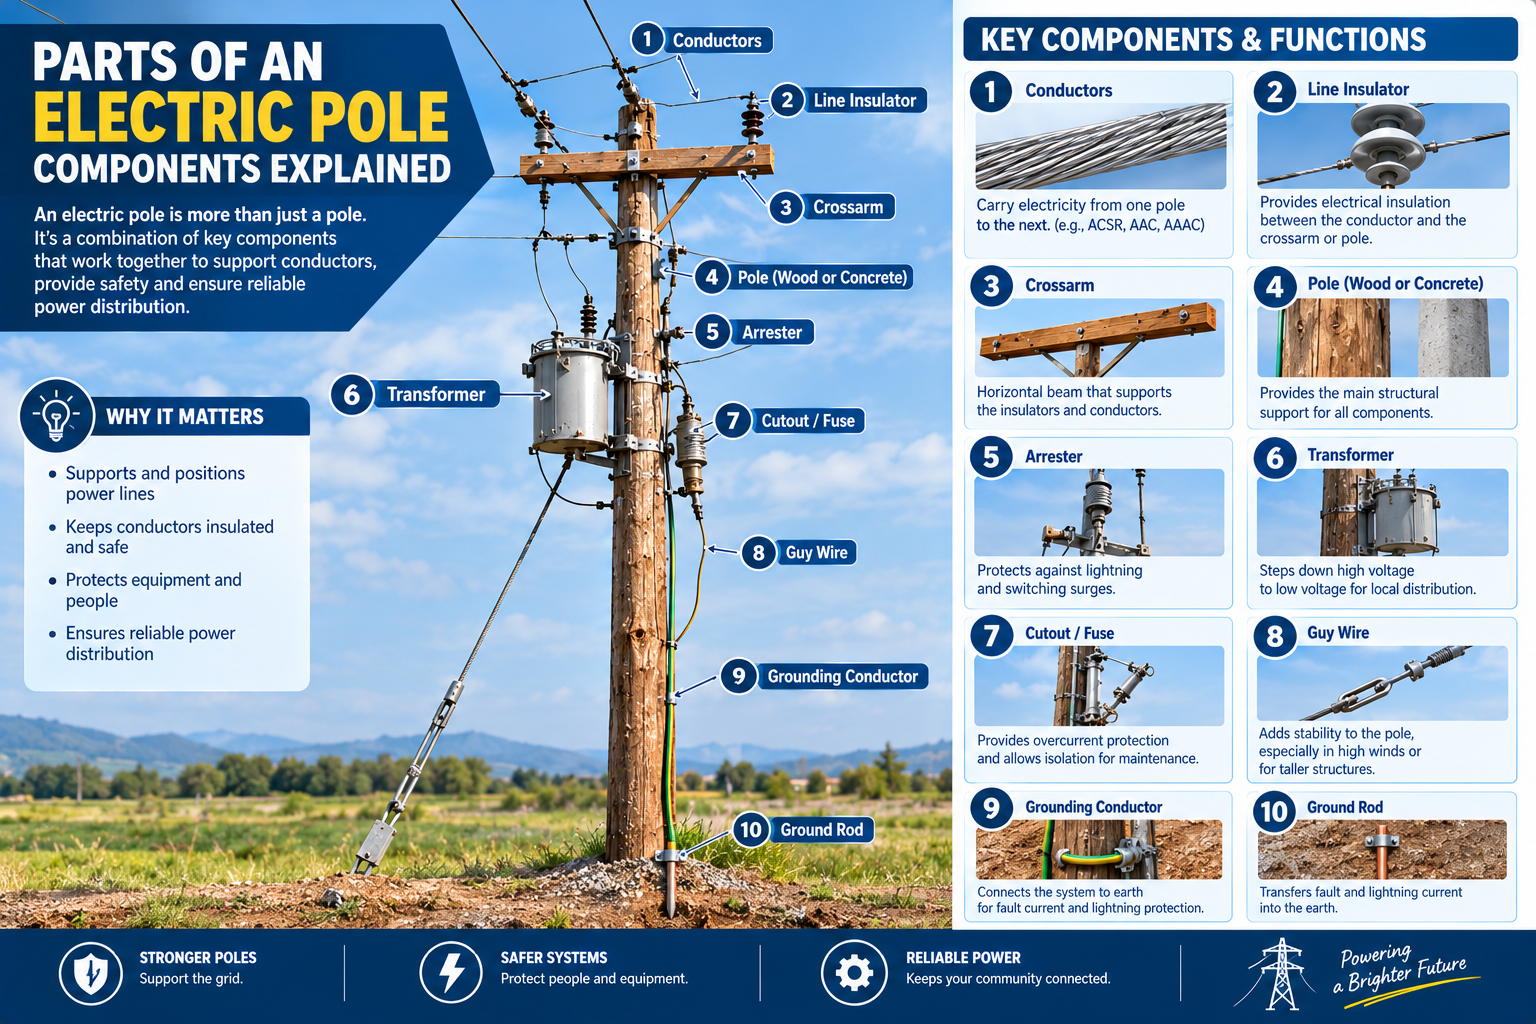
A crossarm carries the insulators and conductors and takes their load into the pole, so mounting it correctly matters for the whole structure. This step-by-step guide covers installing a crossarm on a utility pole.
Step 1: Choose and Size the Crossarm
Before installing, make sure it’s the right crossarm:
- The type a symmetric electrical (EC) or power-pole (SA) arm, a V-type for heavier duty, or an alley arm where one side must stay clear.
- Sized to the conductors, spacing, and load, and drilled to your hole pattern.
(See our how-to-choose-a-crossarm guide.)
Step 2: Position It on the Pole
Position the crossarm at the correct height (for clearance and the line design) and level, square to the line. Mark the mounting hole location. For a symmetric arm, center it on the pole; for an alley arm, orient the offset to the side with clearance.
Step 3: Mount It
Mount the crossarm to the pole:
- Through-bolt a machine bolt or double-arming bolt (the latter for arms on both sides) passed through the pole, with a nut and square washer to spread the load (especially on timber).
- Or a pole band a pole band clamped around the pole provides the mounting lugs; it must be sized to the pole diameter at the mounting height, because poles taper.
Snug the mounting so the arm is held but can still be leveled.
Step 4: Brace It
A symmetric crossarm needs a flat crossarm brace to triangulate it running from a point lower on the pole up to the arm, stiffening it against the conductor loads so it doesn’t rotate or sag. Fit the brace(s) on both sides of a symmetric arm. (An alley arm has its brace integral.)
Step 5: Level, Square, and Torque
With the arm and brace fitted, level the crossarm, make it square to the line, and then torque all bolts to specification. Correct torque holds the arm firmly without over-stressing the pole or bolts; the pole band (if used) must clamp tight enough not to slip. A crossarm that isn’t level or square throws off the conductor geometry.
Step 6: Fit the Insulators
Fit the insulator pins at the drilled positions, then mount the pin or post insulators that will carry the conductors. The crossarm is now ready to receive the conductors. (See our assemble-a-distribution-pole guide for the full pole.)
Installation Checklist
| Step | Check |
|---|---|
| Crossarm | Right type, sized, drilled |
| Position | Height, level, square |
| Mount | Through-bolt or pole band (sized to pole) |
| Washer | Square washer to spread load |
| Brace | Fitted, triangulating the arm |
| Torque | All bolts to spec, band tight |
| Insulators | Pins and insulators fitted |
How to Install a Crossarm: FAQ
How is a crossarm mounted to a pole? By a through-bolt (a machine bolt or double-arming bolt passed through the pole with a nut and washer) or by a pole band clamped around the pole. A symmetric arm is also braced with a flat crossarm brace. The band must be sized to the pole diameter at the mounting height, since poles taper.
What bolts are used to install a crossarm? A machine bolt for a single arm, or a double-arming bolt for crossarms on both sides of the pole, with a nut and a square washer to spread the load (important on timber poles). Torque them to specification, and use a galvanized finish for outdoor corrosion life.
Why does a crossarm need a brace? Because the conductor loads try to rotate and sag the arm; a flat crossarm brace triangulates it running from lower on the pole up to the arm to stiffen it and hold it level. Symmetric arms are braced on both sides; alley arms have an integral brace.
How do I size a pole band for a crossarm? By the pole diameter at the mounting height not the base because poles taper from butt to tip. Measure or take the diameter where the band will clamp, and use a band sized to it so it grips tight. A band too big won’t grip; too small won’t close.
Does the crossarm need to be level? Yes a crossarm must be level and square to the line, or the conductor geometry and spacing are thrown off. Level and square it before final torquing, and confirm it stays so after the bolts are tightened.
What goes on the crossarm after it’s installed? Insulator pins at the drilled positions, then pin or post insulators that carry the conductors. The crossarm sets the phase spacing; the insulators do the insulating. After that, the conductors are tied or clamped to the insulators.
The Bottom Line
Installing a crossarm is six steps: choose and size it, position it level and square, mount it (through-bolt or a correctly-sized pole band), brace it, torque all bolts, and fit the insulators. The keys are a band sized to the pole diameter at mounting height, a proper brace, correct torque, and a level, square arm so it carries the conductor loads reliably.
DAPENG Power (DP Power Fitting) manufactures the crossarm and everything to mount it steel crossarms (EC, SA, V-type, alley), pole bands, braces, bolts, washers, and insulator pins. Tell us your pole, conductors, and spacing, and we’ll supply the crossarm and mounting kit.